Whether you are new or already experienced with Django, you’ve surely come across the concept called migrations. In this “Django Migrations – Explained Through Examples” article, I’ll guide you through migrations and show you all the important pieces of information you need to know.
In short, migrations in Django are the way of recording and propagating changes made in Django models to the database schema. Migrations can be generated automatically or written manually if more control is needed. Django stores specific migration-related information in the migrations directory inside each app.
Django offers a few commands that make working with migrations much easier. These commands are:
- makemigrations
- migrate
- sqlmigrate
- showmigrations
I will first explain in more detail what are migrations and what problems are they solving. Then I’ll show you how to work with migrations in Django and use the commands.
What are migrations?
Django is designed to work with relational databases such as PostgreSQL, MySQL, SQLite where data is organized into tables. Each database table consists of rows and columns, where rows represent individual records, while columns represent records’ attributes. To create, read, update, and delete data, SQL statements must be executed.
Django’s ORM
To avoid writing custom SQL statements for each operation, Django introduced one of its most powerful features: ORM (Object-Relational Mapper).
Django ORM enables you to interact with the database through objects and their methods instead of SQL statements. It converts your Python code to equivalent SQL statements. So, instead of writing SQL to define database tables, you do it by defining Django models. The same applies to any other kind of operation related to a database.
For example, when you need to fetch all records from a table, Django’s ORM enables you to do this: Record.objects.all()
instead of this:SELECT * FROM db.record_table;
Still, only defining Django models isn’t enough to reflect changes to the database immediately. That’s where migrations come into play.
How do migrations work in Django?
Migrations are quite important when it comes to creating a new model, altering or removing an old one, or defining relationships between models. In Django, migrations are a set of operations that have to be executed in the correct order to propagate all model changes to the database schema.
To successfully reflect changes from models to the database schema, the following three steps need to be performed.
- Make a change in models.py.
Django keeps track of what changes were made to the models and later generates migration files based upon those changes. If any differences between previous and current model definitions are noticed, they are automatically included in the next migration. - Run
makemigrationscommand to create a migration file.
After you execute the command, Django will go through all apps defined insideINSTALLED_APPSinsettings.pyand look for differences inside eachmodels.pyfile. All changes will be included in the migration file which will appear in the migrations directory inside an app. - Run
migratecommand to apply changes to the database.
This command executes all operations inside the migration files. This ensures that changes in the Django models are appropriately reflected in the database schema.
NOTE - Migration files contain operations that have to be executed in that exact order so the changes could stay consistent. These operations ensure that the resulting database state will always be the same if you run migrations on the same dataset, but a different database.
Migration file example
Migration files are nothing else than Python files with a predefined structure. Here’s a basic example of how the empty migration file looks like:
from django.db import migrations

class Migration(migrations.Migration):

    dependencies = [
    ]

    operations = [
    ]
You can notice two important attributes:
dependencies– a list of migrations the current one depends on.operations– a list of declarative instructions that are executed in the exact order as defined. Django converts each instruction to an SQL statement and executes it on a database schema.
Django migrations through examples
Enough theory, let’s dive into the real-life examples of working with migrations. I’ll show you how you can create migrations, apply them and even revert them.
Before going further, let’s just set up the stage for the show. We’ll start with the project structure that looks like this:
libraryproject/
├─ library/
│  ├─ migrations/
│  │  ├─ __init__.py
│  ├─ admin.py
│  ├─ apps.py
│  ├─ models.py
│  ├─ tests.py
│  ├─ views.py
│  ├─ __init__.py
├─ libraryproject/
│  ├─ asgi.py
│  ├─ settings.py
│  ├─ urls.py
│  ├─ wsgi.py
│  ├─ __init__.py
├─ manage.py
You can see that inside the libraryproject there’s an app called library. It will be used for a simple demonstration of migrations. Make sure to include the library app in the INSTALLED_APPS inside libraryproject/settings.py.
Creating migrations
When you start a new project like this one, you should first run migrate command to apply the initial migrations required by the default Django apps.
$ python manage.py migrate
Operations to perform:
  Apply all migrations: admin, auth, contenttypes, sessions
Running migrations:
  Applying contenttypes.0001_initial... OK
  Applying auth.0001_initial... OK
  Applying admin.0001_initial... OK
  Applying admin.0002_logentry_remove_auto_add... OK
  Applying admin.0003_logentry_add_action_flag_choices... OK
  Applying contenttypes.0002_remove_content_type_name... OK
  Applying auth.0002_alter_permission_name_max_length... OK
  Applying auth.0003_alter_user_email_max_length... OK
  Applying auth.0004_alter_user_username_opts... OK
  Applying auth.0005_alter_user_last_login_null... OK
  Applying auth.0006_require_contenttypes_0002... OK
  Applying auth.0007_alter_validators_add_error_messages... OK
  Applying auth.0008_alter_user_username_max_length... OK
  Applying auth.0009_alter_user_last_name_max_length... OK
  Applying auth.0010_alter_group_name_max_length... OK
  Applying auth.0011_update_proxy_permissions... OK
  Applying auth.0012_alter_user_first_name_max_length... OK
  Applying sessions.0001_initial... OK
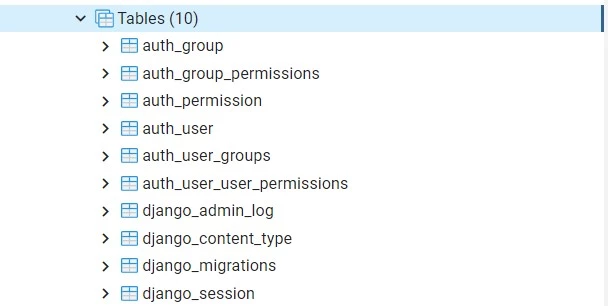
The newly created database should have all the following tables listed.
Now let’s open library/models.py and add our new Book model there.
from django.db import models

class Book(models.Model):
    title = models.CharField(max_length=255)
    description = models.TextField()
    published_date = models.DateTimeField()
After you add the Book model to models.py, run makemigrations command to generate a migration file.
$ python manage.py makemigrations
Migrations for 'library':
  library\migrations\0001_initial.py
    - Create model Book
Description in a terminal says that a new migration file was created at library/migrations/0001_initial.py and its purpose is to create a Book model.
And indeed, if we look at the project structure again, there’s a new file in the library/migrations directory.
libraryproject/
├─ library/
│  ├─ migrations/
│  │  ├─ 0001_initial.py
│  │  ├─ __init__.py
│  ├─ admin.py
│  ├─ apps.py
│  ├─ models.py
│  ├─ tests.py
│  ├─ views.py
│  ├─ __init__.py
├─ libraryproject/
│  ├─ asgi.py
│  ├─ settings.py
│  ├─ urls.py
│  ├─ wsgi.py
│  ├─ __init__.py
├─ manage.py
Let’s take a look how this newly created migration file looks like.
from django.db import migrations, models

class Migration(migrations.Migration):

    initial = True

    dependencies = [
    ]

    operations = [
        migrations.CreateModel(
            name='Book',
            fields=[
                ('id', models.BigAutoField(auto_created=True, primary_key=True, serialize=False, verbose_name='ID')),
                ('title', models.CharField(max_length=255)),
                ('description', models.TextField()),
                ('published_date', models.DateTimeField()),
            ],
        ),
    ]
There are three attributes in the current migration file. The first one, initial=True, means that this is an initial migration file for this app, therefore has no previous dependencies. This is also clear from the dependencies attribute, which is an empty list. The most important attribute is the operations list. There’s only one instruction in the list at the moment, which is responsible for creating a new database table with 4 columns (id, title, description, published_date) that will represent our Book model.
Applying migrations
To apply the migration, you need to run migrate command. It will execute the instructions defined in the migration file and reflect changes to the database.
$ python manage.py migrate
Operations to perform:
  Apply all migrations: admin, auth, contenttypes, library, sessions
Running migrations:
  Applying library.0001_initial... OK
After successfully applying migrations, our database just got a new table called library_book. The default convention of naming is <app>_<model>.

Changing an existing model
What will migrations look like if we change something inside our Book model? Let’s find out. I’ll remove the description field from the Book model, so the model now looks like this:
from django.db import models

class Book(models.Model):
    title = models.CharField(max_length=255)
    published_date = models.DateTimeField()
We run the makemigrations command again.
$ python manage.py makemigrations
Migrations for 'library':
  library\migrations\0002_remove_book_description.py
    - Remove field description from book
As you can see, a new migration file was generated in the same directory as the initial one. But this one is named differently and even has a different message printed out. Let’s peek into it.
from django.db import migrations

class Migration(migrations.Migration):

    dependencies = [
        ('library', '0001_initial'),
    ]

    operations = [
        migrations.RemoveField(
            model_name='book',
            name='description',
        ),
    ]
There are a few major differences in comparison with the initial migration file:
- The
initial=Truestatement does not show up in this file, because the initial migration file,0001_initial.py, already exists. - The
dependencieslist is not empty anymore. Django put a reference to the previous migration in the dependencies list to make it clear in what order migrations should be applied. - In the
operationslist, you can notice that Django created an instruction for removing the description field from the Book model.
As I already mentioned, for each new migration file we need to execute the migrate command to apply the migrations.
$ python manage.py migrate
Operations to perform:
  Apply all migrations: admin, auth, contenttypes, library, sessions
Running migrations:
  Applying library.0002_remove_book_description... OK
How to reverse migrations
Another important thing to know is how to reverse migrations. In case you did a mistake, or just testing out a new migration, this will help you turn everything back as it was.
To reverse migration in Django, look at the unique number of the migration you want to reverse to. Then type the migrate command in the following format:
python manage.py migrate <app> <number>
In our example, let’s say we want to revert a migration that removed the description from the Book model. So, we want to discard changes from 0002 and revert to 0001. Let’s do it.
$ python manage.py migrate library 0001
Operations to perform:
  Target specific migration: 0001_initial, from library
Running migrations:
  Rendering model states... DONE
  Unapplying library.0002_remove_book_description... OK
Now if we inspect the Book table in the database, we’ll see that the description column is back again.
Yet, Django didn’t remove the 0002_remove_book_description.py file from the migrations directory. So if you decide to run the migrate command again, it would migrate all the unapplied changes, including the ones from the 0002_remove_book_description.py file.
Django offers a useful command to track the applied migrations for each app. Running the showmigrations command will list all the migrations, putting an x sign next to the ones that are applied.
$ python manage.py showmigrations
admin
 [X] 0001_initial
 [X] 0002_logentry_remove_auto_add
 [X] 0003_logentry_add_action_flag_choices
auth
 [X] 0001_initial
 [X] 0002_alter_permission_name_max_length
 [X] 0003_alter_user_email_max_length
 [X] 0004_alter_user_username_opts
 [X] 0005_alter_user_last_login_null
 [X] 0006_require_contenttypes_0002
 [X] 0007_alter_validators_add_error_messages
 [X] 0008_alter_user_username_max_length
 [X] 0009_alter_user_last_name_max_length
 [X] 0010_alter_group_name_max_length
 [X] 0011_update_proxy_permissions
 [X] 0012_alter_user_first_name_max_length
contenttypes
 [X] 0001_initial
 [X] 0002_remove_content_type_name
library
 [X] 0001_initial
 [ ] 0002_remove_book_description
sessions
 [X] 0001_initial
Notice how the latest migration (0002_remove_book_description) from the library app is unchecked. That’s exactly what we wanted to achieve with reverting a migration.
WARNING - Not all migrations can be reverted. If you try to revert an irreversible operation, Django will raise the IrreversibleError.
Tips & Tricks to becoming a Django migrations ninja
You can do powerful stuff with knowing Django migrations well. There’s plenty of functionalities Django offers to define database schema, alter tables, migrate data, etc. I summarized some of the most useful points to help you master the migrations easier.
Keep migrations clean
The number of migration files can quickly increase if you’re doing a lot of changes to models. In that case, use the squashmigrations command to squash the chosen migrations into one file. Django will even optimize a number of operations required to be executed to achieve the same state.
Name your migrations
To have a more descriptive overview of generated migrations, you should name your migrations appropriately. By using the --name parameter, you can give a custom name to the new migration file. For example, if you add an author field to our Book model and execute makemigrations this way:
python manage.py makemigrations library --name add_author_field ,
It will create a file called 0003_add_author_field.py
Backup data before applying migrations
If it’s possible, back up your data before applying new migrations. Especially if complex changes are introduced with breaking changes involved. That way you can stay calm and turn everything back to normal even if it goes wrong.
Examine migration code
Django comes with the sqlmigrate command which enables you to see the exact SQL code generated from the migration file. Use it whenever you want to see how things are done under the hood.
Include migration files in Version Control
Unless you are just testing things locally, always include the migration files in the version control system (eg. Git). There are three reasons to do that:
- You should always be able to migrate the production database. For that, you’ll need recorded steps of how did you even get to the current database state.
- Take into consideration that for specific cases, you’ll need to manually write migration code. Running the makemigrations command in a different environment will not magically generate your custom-written code.
- Migrations have a huge impact on the functionalities and data. Therefore, migrations should be included in a code review as well as any other piece of code.
Conclusion
I hope you now understand Django migrations better. In essence, it all comes down to planning and changing the models, creating migration files, and applying migrations to reflect changes to the database. Django will do all the rest dirty work for you.
To summarize, you can migrate changes by following these 3 steps:
- Change your models
- Run
makemigrationscommand - Run
migratecommand
Thank you for reading, see you next time!